Plotting Parametric Equations on the TI-83+ and TI-84+

We at Calcblog hope you had a great winter vacation! So far, we’ve posted tutorials on graphing in rectangular/Cartesian and polar coordinates, but there are other ways to specify functions. One of these is as a function of a parameter, or a so called “parametric” equation.

This might be useful, for example, for writing X and Y coordinates of an object as a function of the parameter T, for time. We might have the following equations:

  • X=5T
  • Y=10-16T²

A glance into your physics textbook might tell you that these equations describe the coordinates of a particle with an X velocity of 5 feet per second, starting out 10 feet in the air and subject to Earth’s gravity. Let’s plot this on our calculator.

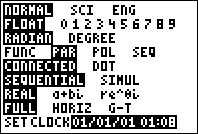
First, press MODE to get to the mode menu, and use the arrow keys to select PAR. Press ENTER.

para 01 Plotting Parametric Equations on the TI 83+ and TI 84+

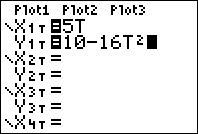
Second, press Y= to get to the equation entry screen. Enter the corresponding X and Y equations.
para 02 Plotting Parametric Equations on the TI 83+ and TI 84+

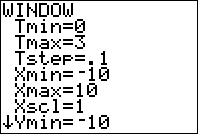
Third, press WINDOW to get to the window screen. This is one of the most important parts of the process. In addition to setting the normal display limits, you must also specify a minimum T, a maximum T, and a step with which to plot the points. If you specify too large of a Tstep, your plot will look jagged or even misleading. If you specify one that is too small, it may take longer for your equation to graph.

Here, we’re sticking with the standard window (which you can always reach by pressing ZOOM and selecting ZStandard), but setting 0≤T≤3 with a step of .1 seconds.
para 03 Plotting Parametric Equations on the TI 83+ and TI 84+

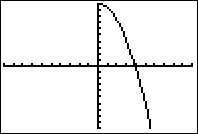
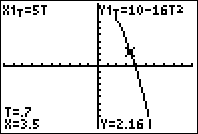
Press GRAPH to view the plot. We see the path of our object plotted out in x-y coordinates.
para 04 Plotting Parametric Equations on the TI 83+ and TI 84+

Press TRACE to use the left and right arrow keys to trace out the curve. It looks like the particle hits the “ground” (Y=0) at around .8 seconds. We can solve this exactly by solving 0=10-16T², or T=√(10/16), which is about .791 s.
para 05 Plotting Parametric Equations on the TI 83+ and TI 84+

Parametric equations can be a very practical way of looking at the world and are very useful in science, engineering, and design. We hope this tutorial was a useful introduction or refresher. As always, questions, comments, and suggestions are welcome via our contact form. Thank you for reading!

Filed under Algebra, Calculus, Difficulty: Easy, TI-83 Plus, TI-84 Plus | Leave a comment

Video: Using Variables on Your TI Graphing Calculator

We just posted our second video tutorial to YouTube! This tutorial covers the basic use of variables to help with calculations, a technique that will help you use your calculator more effectively and avoid making mistakes when entering quantities. We hope you enjoy this short presentation! As always, if you have suggestions for other videos or just general questions, you can contact us via our contact form.

-Eric

Filed under Algebra, Difficulty: Easy, TI-83 Plus, TI-84 Plus | Leave a comment

Getting Started with the HP 50g

While the TI-84 and TI-89 series are the most popular on the market, there are many other graphing calculators with advanced functionality. This guide, a Calcblog guest post by ime1729 (Matthew Lin), guides you through the basic setup of your calculator and learning to use RPN (reverse Polish notation).

1. Introduction

So you decided to go ahead and buy yourself an HP 50g calculator. Maybe it was because it was on sale for $90 at Fry’s, your oddball engineer uncle got it for you, or you just decided to jump on the RPN trend. Unlike many of the calculators that you have used before, the HP 50g is significantly different and has a short but steep learning curve, which certainly pays off. As an experienced user of an HP 50g calculator, I will never want to look back at the TI series (except to play Tetris… maybe.)

2. Go back to the store!

The first thing you will notice from the HP 50g is that it uses a ARM processor and an SD card. The ARM processor is an older model, running at 203 MHz top and 75 MHz during a calculation.

2.1 Batteries

This calculator is a power hog! When I was using this calculator heavily for a calculus class, I would drain the batteries every week and a half or so. For the sake of the environment (and your wallet – the constant battery use will get pricey very fast), go and buy yourself a pack or two of AAA rechargeable batteries. Some good choices are either the Sanyo eneloops or the Amazon Basics (what I use). If you don’t have a charger, you can get one for under $20 – typically $15. It will pay for itself within a term of using your calculator regularly.

Also, if you are relying on this calculator, it is advised that you carry around a spare pair of batteries everywhere you go. The HP 50g isn’t very well protected, and it may turn on in your bag, draining your batteries. Since this (sadly) happens far too often for me to count, it is advised that you keep a set of backup batteries at all times.

Luckily, the calculator will run off of USB power. If you happen to have a dead calculator and have somebody to mooch a powered USB port off of, you can still use your calculator without straining your batteries.

2.2 SD card

There is an SD card slot at the bottom of your calculator that accepts up to 2 GB (There are 4 GB SD cards out there, but they are relatively rare.) A 2 GB card should cost no more than $10 and typically only $5-$7, and it provides effectively unlimited memory for your calculator. Note that you cannot run programs straight off the SD card, but despite that limitation, it is an invaluable resource and you should definitely buy a card if you are planning on using your calculator often.

All this being said, you can expect to spend an extra $15-$40 in accessories.

3. Getting acquainted with your calculator

3.1 The shift keys

There are three modifier keys on the HP 50g, and they are (fortunately) all located within easy reach – the ALPHA alpha Getting Started with the HP 50g, the left shift ls Getting Started with the HP 50g, and the right shift rs Getting Started with the HP 50g. Unlike the TI 89, each key has at least three functions assigned to it, so you get more control without having to dig through traditional full screen menus. 1

3.2 Turning the calculator in for the first time

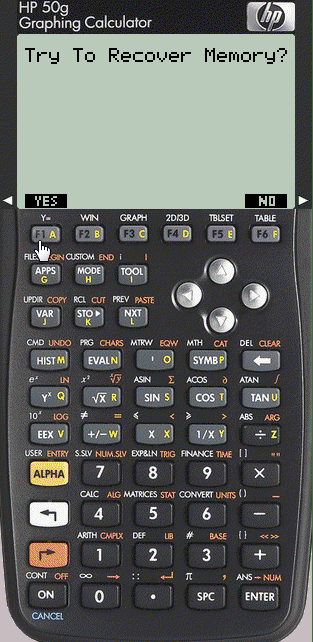
After putting in the batteries, press on Getting Started with the HP 50g to turn the calculator on for the first time. You will be greeted with the following screen, where you should press f1 a Getting Started with the HP 50g.

screen 000003 Getting Started with the HP 50g

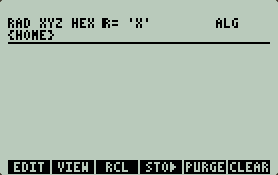
Afterwards, you will be greeted with this screen:

screen 000006 Getting Started with the HP 50g

Note the bottom edge:

screen 000007 Getting Started with the HP 50g

This is called the soft menu. Notice that each box in the soft menu has a corresponding button below it. For example, by pressing f6 f Getting Started with the HP 50g you will send the command CLEAR. Many times, however, the menu is longer than the six
boxes displayed. In order to view the next six choices in the menu, press nxt l Getting Started with the HP 50g. Doing this on the home screen changes the home menu to

screen 000008 Getting Started with the HP 50g

In order to view the previous six choices that you just have seen 2, press ls Getting Started with the HP 50g nxt l Getting Started with the HP 50g. Note that the soft menu can only display 5 digits of the name at a time, so if you want to see the full names inside the choose boxes, hold down rs Getting Started with the HP 50g and press down Getting Started with the HP 50g. An example of what these would look like is this:

screen 000009 Getting Started with the HP 50g

3.3 First calculations.

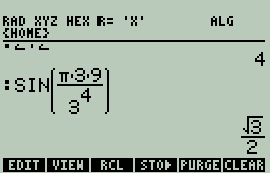
At the end of the day, this calculator is a calculator. Let’s try some basic calculations, such as 2+2 and sin(π*(3*9)/(34)). You can enter the first calculation with the key sequence 2 Getting Started with the HP 50g plus Getting Started with the HP 50g 2 Getting Started with the HP 50g enter Getting Started with the HP 50g

The second expression would be a bit harder to input. The keystroke sequence is sin s Getting Started with the HP 50g ls Getting Started with the HP 50g spc Getting Started with the HP 50g mult Getting Started with the HP 50g ls Getting Started with the HP 50g minus Getting Started with the HP 50g 3 Getting Started with the HP 50g mult Getting Started with the HP 50g 9 Getting Started with the HP 50g right Getting Started with the HP 50g div z Getting Started with the HP 50g ls Getting Started with the HP 50g minus Getting Started with the HP 50g 3 Getting Started with the HP 50g exp q Getting Started with the HP 50g 4 Getting Started with the HP 50g enter Getting Started with the HP 50g. This is more or less what you would be doing on a TI calculator. The only difference is that you can only insert pairs of parentheses. In the case that you only want one parenthesis, insert a pair and remove the one that you do not want. To close a pair of parentheses, simply press right Getting Started with the HP 50g.

Your screen should now look like this:

screen 000010 Getting Started with the HP 50g

Let’s clear the screen, either by pressing rs Getting Started with the HP 50g del Getting Started with the HP 50g or tool i Getting Started with the HP 50gf6 f Getting Started with the HP 50g

4. Switching to RPN mode, and settings

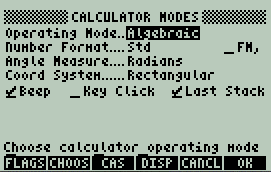
To enter into the settings page, press mode h Getting Started with the HP 50g. You will see the following screen:

screen 000011 Getting Started with the HP 50g

4.1 Side note on RPN

The operating mode refers to whether you are inputting it in algebraic notation or RPN notation. Whether RPN or algebraic notation is better is probably the second oldest geek debate in history. Here are both sides of the debate:

4.1.1 Arguments for algebraic notation

  • It is more natural to input (subjective)
  • Most calculators use this notation
  • You can input it as you see it from your scratchwork.

4.1.2 Arguments for RPN (reverse polish notation)

  • Less prone to making errors (after becoming proficient)
  • Fewer keystrokes
  • No ambiguous expressions, such as -24
  • No need for managing and balancing open-parens and close-parens.
  • You can do a side calculation (this is no longer relevant on the TI-Nspire) without having to stop mid-input
  • You see the intermediate results, and potentially notice if something goes wrong relatively quickly.

4.2 Switching to RPN

Using the arrow keys to navigate to “Algebraic” and press f2 b Getting Started with the HP 50g (CHOOS). Select RPN, and press OK (f6 f Getting Started with the HP 50g).

4.3 The selections in the calculator modes

Field Description
Operating Mode Choose between using your calculator in Algebraic mode or RPN mode.
Number Format Choose between standard notation, scientific notation, and engineering notation. Note that the decimal point will not appear unless if you are dealing with approximate values.
FM, In some places of the world, the decimal point is replaced by a comma. If you use a decimal point in the place of a comma, check this box by pressing f2 b Getting Started with the HP 50g. Otherwise, leave it unchecked.
Angle measure Choose how you want to measure your angles – degrees, radians, or grads.
Coordinate System Choose between using rectangular 3D coordinates, polar cylindrical coordinates, or spherical coordinates. Coordinate points and vectors on the stack will automatically be converted.
Beep Every time there is an input error, the calculator will accompany the error message with a beep. If you are using the calculator during a test or in a quiet place, turn it off.
Key click Every time that you press a key, a high pitched noise will be given as feedback, which may come useful (presumably) if you are wearing gloves while using your calculator.
Last stack Keep this on; it lets you undo your work.

4.4 A couple of flags to change

Some of the more advanced settings on HP calculators are done by switching flags. We recommend switching the following flags:

60 The key alpha Getting Started with the HP 50g locks Alphanumeric characters (flag on) vs alpha Getting Started with the HP 50g alpha Getting Started with the HP 50g
locks Alphanumeric character (flag off). It is highly subjective, but since you can access the number pad and do not need to access the function layer (white print) actively while, it would typically save you time.
116 This is also entirely subjective; whether you want trigonometric simplification to prefer simplifying to cosine or sine.
117 Soft menu vs choose boxes. Choose boxes typically disrupt your workflow and are relatively clunky to use, so toggle the flag on and use soft menus instead. Note that certain features, especially the STAT menu, are only available as choose boxes.

5. Learning RPN

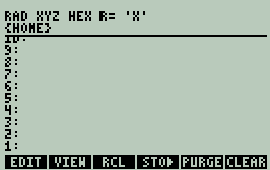
The first thing you should notice is that the home screen looks significantly different now.

screen 000012 Getting Started with the HP 50g

The main (or only) difference is that instead of the calculator displaying your previous calculations, you are instead greeted with a stack. The stack has many uses, depending on how you want to use it. It is used as a history archive for past calculation results, previous versions of a program that you may be making, or a workspace for a calculation. A large stack, however, may quickly slow down your calculator, so it is recommended to keep the stack clean.

5.1 How RPN works

Instead of functions taking in arguments, as in algebraic mode, calculations are performed by taking a number of elements off of the stack, and then returning values back onto the stack. You can manipulate the stack either by calling functions, or by entering values. Once you remove an element from the stack, all of the elements above it will drop down one, and once you insert an element into the stack, all the elements above it will pop up by one. Once you get used to it, the concept of stack manipulation will come naturally.

The numbers on the left are the stack levels. The first level is level 1, the second level is level 2, and so forth.

5.2 Your first calculation: 2+2

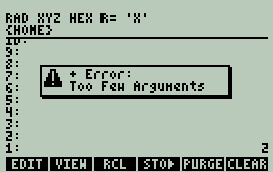
Try pressing 2 Getting Started with the HP 50g plus Getting Started with the HP 50g. You’ll hear an unpleasant beep, and then an error message:

screen 000013 Getting Started with the HP 50g

‘Too few arguments’ means that the function requires more arguments than how many items you have on the stack. The addition function takes two values from the stack and returns the sum as one value. Press on Getting Started with the HP 50g to dismiss the message, and then enter the second ‘2’ into the stack, then add them together. This is somewhat like setting up a vertical equation in elementary school, where you wrote down the two numbers, drew the line, and then put the plus sign. All told, the key sequence is 2 Getting Started with the HP 50g enter Getting Started with the HP 50g 2 Getting Started with the HP 50g enter Getting Started with the HP 50g plus Getting Started with the HP 50g or 2 Getting Started with the HP 50g enter Getting Started with the HP 50g 2 Getting Started with the HP 50g plus Getting Started with the HP 50g.

You may have noticed that the second enter was optional. When you use a function when you have something typed in, the calculator will first take the value(s) that you have typed in, put them into the stack or evaluate them, and then finally call the function that you have keyed in. The separator on the HP 50g is a blank space, so 2+2 could also be entered as 2 Getting Started with the HP 50g spc Getting Started with the HP 50g 2 Getting Started with the HP 50g plus Getting Started with the HP 50g. Note that this is not the preferred way of performing a calculation unless if there are special circumstances.

5.3 What parentheses? SIN((π*3*9)/(34))

You probably have noticed that parentheses are hard to reach on the HP50g. That’s because you rarely ever use them. Nor will you have to remember order of operations because these are non-issues on an RPN calculator. RPN essentially works by taking calculations and then breaking them down step by step, giving you full control and a good view of intermediate values. In the calculation above, we see that the two smaller equations are (π*3*9) and (34). Let’s first calculate (π*3*9), where pi can be inserted into the stack by pressing ls Getting Started with the HP 50g spc Getting Started with the HP 50g. You should get 27π as your answer. Now, let’s calculate 34, where the exponent function takes in two numbers and returns you the power of the value on level 2 to the value on level 1. Now, we have the two values of the two sub equations, and we press the divide key to divide the second level by the first level, and then hit the sine key to take the sine of that. If you have been paying attention, you would have noticed that I gave you a long winded way of taking the sine of π/3. All being said, the keystroke sequence is ls Getting Started with the HP 50g spc Getting Started with the HP 50g 3 Getting Started with the HP 50g mult Getting Started with the HP 50g 9 Getting Started with the HP 50g mult Getting Started with the HP 50g 3 Getting Started with the HP 50g 4 Getting Started with the HP 50g exp q Getting Started with the HP 50g div z Getting Started with the HP 50g sin s Getting Started with the HP 50g.

There is much more you can do with your HP 50g, and this tutorial has hopefully served as a useful introduction to your calculator’s basic features and to using RPN. Have fun!

Footnotes:

1 On the HP 50g, for normal work, there is no need to ever touch menus at all.

2 This refers to the six choices that you have seen, not the previous six in the list. If you move from one soft menu to another, pressing previous would bring you to the previous soft menu.

Filed under HP 50g | 1 Comment

How to Enter Logarithms on Your Graphing Calculator

Most graphing and scientific calculators have the ability to calculate logarithms, but you might come across questions which require you to use a different base than your calculator’s built-in functions. Thankfully, there is a simple formula called the “change of base” formula that allows you to calculate any logarithm on your calculator:

logarithm base change1 How to Enter Logarithms on Your Graphing Calculator

Your calculator may have simply a ln( or log( button, but for this formula you only need one of these:

logarithm base change2 How to Enter Logarithms on Your Graphing Calculator

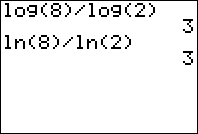
For example, to evaluate the logarithm base 2 of 8, enter ln(8)/ln(2) into your calculator and press ENTER. You should get 3 as your answer. Try it for yourself!

log change of base How to Enter Logarithms on Your Graphing Calculator

Filed under Difficulty: Easy, TI-83 Plus, TI-84 Plus, TI-89, TI-92 Plus | 7 Comments

How to Graph Polar Equations on the TI-83+ and TI-84+

Polar coordinates are another way of representing a two-dimensional space, just like Cartesian (rectangular) coordinates. Instead of x and y, points are described using r, a radius, and θ (theta), the angle counterclockwise from the positive x axis.

In this tutorial, learn how to use your TI-83, TI-83 Plus, or TI-84 Plus to graph equations in polar variables. If you’re interested in a basic introduction to graphing features, check out our tutorial and video on graphing in rectangular coordinates.

CircularCoordinates How to Graph Polar Equations on the TI 83+ and TI 84+

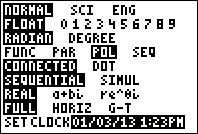
First, we need to make sure we have the correct settings selected. Check your mode menu by pressing the MODE button. Use the arrow buttons to navigate, and ENTER to select an option. To enable polar graphing, make sure the “POL” or “POLAR” option is selected. Polar graphing behaves differently depending on whether you are in radian or degree mode—usually, you’ll want to work in radians.

polar graphing 1 How to Graph Polar Equations on the TI 83+ and TI 84+

Mode menu on the TI-84+. “POL” is selected to enable polar graphing.

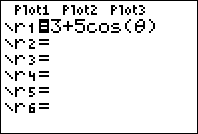
Next, we can go to the equation entry screen by pressing the Y= button, just like for graphing equations in rectangular coordinates. This time, instead of seeing “y=” for each equation, it prompts for each equation in terms of r. If r is a constant, the result will be a circle; otherwise, r is a function of angle. Go ahead and enter the equation you want to graph.

polar graphing 2 How to Graph Polar Equations on the TI 83+ and TI 84+

The equation entry screen with polar graphing on the TI-84+.

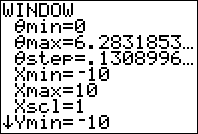
Before we graph our function, we must first confirm that the window sections are correct. Pressing the WINDOW button lets us check these options. In addition to the traditional window settings, we are asked to specify θmin, θmax, and θstep. The default settings are 0, 2*π, and π/24, which means that the calculator will use 48 points to plot the function between θ=0 and θ=2*π. If you want your function to be smoother, you can decrease θstep, but this might increase the draw time.

These defaults are generally good settings so long as you aren’t using degrees for angle measurements. However, while many polar functions repeat after θ=2*π, some, including spirals, continue indefinitely. If your function seems to end before reaching the edge of the screen, you might want to increase your angle range.

polar graphing 3 How to Graph Polar Equations on the TI 83+ and TI 84+

Default window settings for polar graphing.

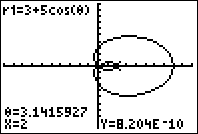
Finally, go ahead and press the GRAPH button to draw your function. Now you can use many of your calculator’s other graph features, including the trace function and the ability to calculate derivatives at a point. Happy plotting!

polar graphing 4 How to Graph Polar Equations on the TI 83+ and TI 84+

Graph of the limaçon r=3+5*cos(θ) on the TI-84+

Filed under Algebra, Difficulty: Easy, TI-83 Plus, TI-84 Plus | 3 Comments

Calculator Policies on the ACT and SAT

Test taking season is upon us and millions of students nationwide are cramming to take the SAT and ACT this fall. Is your calculator allowed? The SAT’s policy is decidedly more lax than that for the ACT, but both allow graphing calculators. Here are the specific policies about what is and isn’t okay on these tests:

SAT

Besides the following notes, there are no specific calculator policies for the SAT except, obviously, you can only use it on the math sections. CollegeBoard’s policy specifically states that you are NOT required to clear your memory before the test, which means it might be helpful to store formulas, lists, or programs on your calculator.

Acceptable Calculators

  • Graphing calculators
  • Scientific calculators
  • Four-function calculators (not recommended)

Unacceptable Calculators

  • Laptop or a portable/handheld computer
  • Calculator that has QWERTY (keyboard-like) keypad, uses an electrical outlet, makes noise or has a paper tape
  • Electronic writing pad or pen-input/stylus-driven device
  • Pocket organizer
  • Cell phone calculator

The TI-83+, TI-84+, TI-86, TI-89, and related models are all allowed on the SAT. The TI-92 and Voyage 200 are not because they have QWERTY-type keyboards.

US Navy 050223 N 5821P 054 Seaman Chanthorn Peou of San Diego%2C Calif.%2C takes his Scholastic Aptitude Test %28SAT%29 aboard the conventionally powered aircraft carrier USS Kitty Hawk %28CV 63%29 Calculator Policies on the ACT and SAT

ACT

The ACT has a very strict calculator policy. Most notably, the TI-89 is NOT allowed. ACT, Inc. makes a point of noting this, so it apparently happens often enough that students get kicked out for it. Don’t let this happen to you. If you have a graphing calculator, its memory must be cleared before the test, and using notes typed onto your calculator is not permitted. If there’s anything that you don’t want to get erased (apps, etc.) make sure they are archived.

All calculators that are unacceptable for the SAT are unacceptable for the ACT, with the addition of calculators with a CAS (built-in computer algebra system). This includes the following:

  • Texas Instruments: All model numbers that begin with TI-89 or TI-92 and the TI-Nspire CAS—Note: The TI-Nspire (non-CAS) is permitted.
  • Hewlett-Packard: HP 48GII and all model numbers that begin with HP 40G, HP 49G, or HP 50G
  • Casio: Algebra fx 2.0, ClassPad 300 and ClassPad 330, and all model numbers that begin with CFX-9970G
  • Calculators that use a stylus are prohibited with the exception of the Sharp EL-9600.
  • The TI-83+ and TI-84+ and related models are acceptable. However, if your calculator has an IR data port (used for optically transferring data between calculators), then the port must be covered with dark tape.

    We hope this helps you prepare for whichever test you will be taking. Good luck!

    -Calcblog

    Filed under ACT, SAT, Test Prep | 1 Comment

    9 Tips for Summer Test Prep

    Summer is the perfect time to get ahead on studying for the SAT and ACT. Set aside a few minutes a day to study and you’ll avoid having to study during the school year. Boost your studying know-how with these handy (but often ignored) tips:

    1. Focus

    Have you ever been working on an essay but found yourself flipping to Facebook or another website every few minutes? It feels impossible to make progress when you can hardly focus long enough to write a single sentence! Here’s a handy tip to avoid this in the future, both with schoolwork and studying: When you’re ready to work, go straight to work before getting on the internet. Open up Microsoft Word before Firefox, or do a few math problems from your assignment before checking the news. Try this, and you’ll be amazed how effective it is. In fact, after you’ve been working for 15 minutes, it usually won’t matter if you take a break and check Facebook, because you’ll go right back to work. Since your body is in the right mindset, you’ll find that you can finish your work faster and have more time for the things you enjoy. Try this, it really works.

    2. Study Vocabulary

    The vocabulary on the English section is the only thing you actually have to memorize for the SAT. Start early, learning a few words a day and reviewing them periodically. There is a multitude of resources available for this, so there’s no reason not to start now. Five minutes a day can improve your SAT score by 100 points!

    3. Calculator

    Of course this one is obligatory—but it’s important! You have no other tools on standardized tests besides a pencil, and eraser, your brain, and a calculator. Which one of these do most people fail to use? (hopefully it’s not their brains!) There are tons of resources other places and here on Calcblog to help you learn to use your calculator effectively. Just remember, you can’t expect to program formulas into your calculator or read up the day before the test and except to succeed. Learning to use your calculator is much more than this, including understanding how to use built-in functions and being able to identify when using a calculator can be helpful. Your calculator alone won’t improve your scores a single point; you have to know how to wield this powerful device.

    TI86 Calculator DivByZero 9 Tips for Summer Test Prep

    4. Set up a Study Schedule and Stick To it

    Procrastination is the enemy of students everywhere, and it can completely derail your study plans. If you wait until the last week to study for the SAT or ACT, you’ll find yourself overwhelmed at how much you have to do and will probably give up on studying altogether. By starting early (now!), and setting aside 30 minutes or an hour a day, you can be completely prepared in a month or two when you decide to take the test. Treat studying like your job—after all, the payout can be just as impressive!

    5. Practice, Practice, Practice

    The number one way to ace the SAT or ACT is to practice. Even if you don’t see results at first, these tests reuse many of the same problems, and you’ll eventually start to see them over and over again. On top of that, you’re honing your reading and problem solving skills for the test. Practice improves confidence and will help you avoid getting choked up if you encounter difficulties during the actual test. For question types such as reading comprehension, practice is the only real way to get better!

    6. Study Wisely

    Studying and practicing might seem like the same thing to you, as they do for most people, but they’re not! There is information you need to learn and review (vocabulary, math techniques, etc.) for the SAT and ACT without ever opening a practice test. You’ll see a lot of this type of information whenever you open a test prep book. Many people ignore this section and just take the practice tests because it seems unhelpful or just plain overwhelming. Here’s how to deal with it: Most people study incorrectly—they keep reviewing things that they already know. You can set yourself apart by becoming a conscious studier; look through everything and mark off what you already know so that you can come back and only focus on the things you need to improve. This saves time while getting the maximum benefit possible.

    640px Studying 9 Tips for Summer Test Prep

    7. Chart Your Progress

    This doesn’t mean simply taking practice tests and comparing your scores. It means creating a plan and marking off what things you have learned or are comfortable with. This can go along with #2 and #4 as well. Creating a visual representation of your study work can help to inspire confidence and keep you on track!

    8. Reward Yourself

    Don’t kill yourself studying, and try to have something to look forward to afterwards; a snack, hanging out with friends, playing video games, etc. This encourages you to study on a regular basis and makes the entire process more fun.

    9. Relax

    Oftentimes, one of the biggest problems for people is getting flustered and bombing an entire section. This can be avoided by being well prepared and by relaxing before the test. Don’t kill yourself studying the night before. Instead watch a movie, go to bed early, get up and eat a good breakfast before the test. During the test, read each question completely to avoid making stupid mistakes, and if you can’t get a question then move on to the others before coming back to it at the end. Remember, not getting the score you want isn’t the end of the world, either—there’s always next time. However, if you’re well prepared, then you’re sure to impress yourself and college admissions officers.

    As always, good luck in your studies, and thanks for following Calcblog!

    Filed under SAT, Test Prep | 1 Comment

    Algebra Series Index

    We originally ran our series on Algebra skills from October 24-28, 2011, and received positive feedback from teachers and students on the content. To make this data easier to access, we’ve placed links to all the articles here—in one place so that it’s easier to navigate between them and share them with others. This index is also over here in our sidebar: →

    As always, if you have suggestions for new math or calculator-related series, be sure to share them with us via our contact forum. Thank you for following Calcblog!

    Algebra Skills

    Our goal for this series is to provide a useful resource for both students and teachers, so that this article can be used in the classroom, for test prep, or to help yourself practice and master skills you never learned. With these tips, we hope you can make your algebra cleaner, faster, and more intuitive.

    Part 1: Replacing Large Expressions With a Single Variable

    Part 2: Moving Quantities Left and Right in Equations

    Part 3: Using Substitution to Solve Equations

    Part 4: How and When to Multiply in Algebra

    Part 5: How to Use Fractions with Algebra Correctly

    Filed under Algebra, Difficulty: Easy | Leave a comment

    Sums and Sequences on the TI-83 Plus and TI-84 Plus

    While they may not have the calculus capabilities of the TI-89, the TI-83 Plus and TI-84 Plus have two great functions for dealing with series and sums, the “seq” and “sum” functions. This tutorial explains how to use these features effectively, as well as how to use the summation feature on newer calculators.

    Sequences – The seq function

    A sequence of numbers is just an ordered list of numbers, for example, {1, 2, 3, 4, 5} or {1, 2, 5, 3, 11, 2, 3}. The “ordered” part simply means that each term in the sequence is assigned a specific index. In the sequence {1, 1/2, 1/3, 1/4, …}, the second term is 1/2 and the fourth term is 1/4. Sequences can be any length, or even be infinite in length.

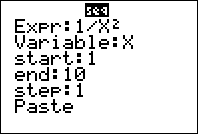
    Sequences are handled on the TI-83 and TI-84 using the seq function. To reach this function from the home screen, press 2nd STAT 5. On newer calculators, a screen will show up which will guide you through entering the function, though in any case the syntax is the same.

    sum seq 1 Sums and Sequences on the TI 83 Plus and TI 84 Plus

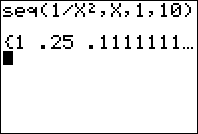
    First, enter the expression you want, next the variable you’re using, and finally the starting and ending values of your variable. The syntax will be pasted onto your screen, so press ENTER to evaluate. Note that on some older models, you might have to put quotation marks around the equation and variable name.

    sum seq 2 Sums and Sequences on the TI 83 Plus and TI 84 Plus

    A list containing your sequence will be returned.

    Summations – Adding up Terms

    A summation is a sum of numbers that are typically defined by a function. For example, saying “the sum from 1 to 4 of n²” would mean 1²+2²+3²+4² = 1 + 4 + 9 + 16 = 30. Sums can also be infinite, provided that the terms eventually get close enough to zero–this is an important topic in calculus. For example, adding up the sum of 1/n does not converge, whereas the sum of 1/n² converges to π²/6, a rather unexpected result.

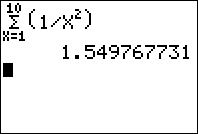
    There are a couple of ways to evaluate sums on your calculator. Calculators with newer operating systems actually have a summation function, which can by reached by pressing MATH 0. With it you can use your arrow keys to select your counting variable (typically X), set the limits, and enter the expression you want to evaluate.

    sum seq 3 Sums and Sequences on the TI 83 Plus and TI 84 Plus

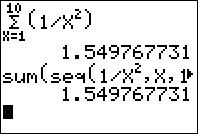
    If your calculator doesn’t have this feature, you can perform the same operation by summing up a sequence: Press 2nd STAT to reach the List MATH menu, 5 to select sum, then select the seq function as above. Press ENTER to evaluate.

    sum seq 4 Sums and Sequences on the TI 83 Plus and TI 84 Plus

    Unfortunately, The TI-83 Plus and TI-84 Plus don’t have a method for evaluating infinity sums, but if you evaluate a convergent summation to enough terms (like 100), it should approximate the infinite sum pretty well. For example. the sum from X=1 to 100 of 1/x² is 1.635, and the infinite sum is around 1.645.

    Filed under Calculus, Difficulty: Medium, TI-83 Plus, TI-84 Plus | 2 Comments

    NEW: TI-83 Plus and TI-84 Plus Function Reference

    For the past two weeks, we’ve been working hard on putting together a complete function appendix for the TI-83 Plus and TI-84 Plus. This is naturally an ongoing process, due to the magnitude of the product, though we are proud to announce that you can now take a look at the first edition here.

    We’re thrilled to be able to offer this resource to the educational community, and we hope you’ll find it useful and informative! Also let us know what else you would like to see with the reference and on other areas of Calcblog.

    ti83 ti84 function reference NEW: TI 83 Plus and TI 84 Plus Function Reference

    Our TI-83 Plus/TI-84 Plus function reference is now online!

    Filed under Calculator Program, TI-83 Plus, TI-84 Plus | Leave a comment