At some point while using your graphing calculator, you will turn on your calculator and be greeted with one of the following messages:

Unlike in many portable electronics, changing your calculator’s batteries does not simply mean swapping them out. In this article, learn about the different batteries in your calculator and how to change them without losing your calculator’s data.
1. Changing the Batteries on your Graphing Calculator – Preparation

Notice the location of the backup battery (1) and standard AAA batteries (2) on this TI-83 Silver Edition
Your Texas Instruments graphing calculator has two sets of batteries: a standard set of AAA alkaline batteries for day to day calculator use, and a lithium or silver oxide backup battery which is used for powering the calculator’s memory when the AAA batteries are removed. On the TI-83, TI-84, and TI-89, if you look at the backside of the calculator and remove the battery cover, you will notice a small cover held in place by a single screw (#1 in the image to the right) which houses the backup battery, and four visible AAA batteries (#2).
In most cases, you will only need to change the set of AAA batteries. Before changing the batteries, it is a good idea to backup any calculator programs you have to avoid potentially losing them, although with good practice this is usually not an issue. There are two ways to do this:
- You can archive your graphing calculator programs and applications, covered in more detail in these articles for the TI-83 and TI-84 Plus and the TI-89 or Voyage 200.
- You can also back up the applications and programs on your computer using the TI-Connect software and calculator connector cable, explained here
2. Removing and Replacing the Standard Calculator Batteries
Once your important calculator programs are backed up (or if you’re going to be gamble and skip this step), you can now replace the batteries.
The first step is to ensure your calculator is powered off. Press 2nd to ensure the calculator is off. Placing the cover over the front of the calculator will ensure you don’t accidentally press any of the calculator keys and turn the calculator on while replacing the batteries.

Remove one battery, replace with the new battery, then proceed on to the next battery.
The best way to replace the batteries is to remove each battery individually, leaving the other three batteries intact, and replacing the battery you removed with a new battery, repeating for each of the four AAA cells. If you remove all batteries at once and then replace them with new batteries, you run the risk of losing your calculator programs. Ensure that the + and – ends are placed correctly. For best results, don’t use both old and new batteries in the calculator. Also, never mix rechargeable and non-rechargeable batteries.
Once you have finished replacing all the batteries, place the battery cover on the back of the calculator, then power up the graphing calculator by pressing the button. If you were receiving a warning message about low batteries before changing the batteries, you should no longer see this message.
3. Adjusting Screen Contrast
Sometimes after changing your battery your calculator home screen contrast may be very dark or very light and you will have difficulty seeing characters on the screen. Fortunately, this is very easy to fix.
Press the 2nd button on your calculator, then either the arrow key to darken the display or arrow key to lighten the contrast. You may have to repeat this process several times, pressing 2nd and the corresponding arrow key until your screen has been returned to normal.
On the TI-89, to change the contrast, press or to adjust the contrast as necessary.
4. Replacing the Backup Battery
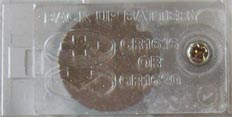
Very rarely you may need to replace the calculator’s backup battery, usually once every three to four years. The backup battery can be found in its own compartment once you remove the battery cover, secured in place by a single screw. This battery is usually a lithium cell battery and shaped like a circular disc, which are also used in many wristwatches.

The calculator's backup battery sits in its own compartment and is held in place with a single screw.
To replace the backup battery, repeat the steps outlined in Step 1 for backing up your calculator’s applications either through archiving or computer backup. It is very important that the standard batteries remain intact in the calculator while replacing the backup battery, otherwise you will lose any data stored in the calculator’s memory.
After removing the standard battery cover, use a small Philips screwdriver to remove the screw holding the backup battery cover in place. Carefully remove the round backup battery. Replace the battery slot with the new backup battery, making sure the + is facing up.
The TI-83 and TI-84 use a CR1616 or CR1620
battery, which you can order through Calcblog’s Amazon.com account to support our site. The TI-89 uses a different battery, the SR44SW
. Be sure to refer to your calculator’s manual for the proper backup battery to use, which may be different than what we have listed here.
Once the new backup battery is installed, place the backup battery cover over the battery and screw the compartment until it is snug. Finally, replace the main battery cover and you’re finished!

22 Responses to How to Change the Batteries on Your TI-83 Plus, TI-84 Plus or TI-89